In this Rktcr level creation tutorial, I will describe how to add dynamic (i.e. physically-simulated) geometry to levels, and how to add constraints between these dynamic bodies. This tutorial builds on ideas introduced in the basics and geometry tutorials.
And, as before, you'll need the latest full version of Rktcr (v3.1 as of this writing).

In this tutorial, I'll start with some existing static geometry, and make some of it dynamic. Above, you can see the plan I'll be following.
If you'd like to follow along, you can download a zip file containing this level (along with the finished version) here. Place the files in your ".rktcr/e_levels" folder, start Rktcr in edit mode, and load tut-dynamics with f4.
Making Dynamics
In Rktcr, all dynamic bodies are created from static geometry, much in the same way smoothed polygons are created from regular polygons.
Select the static geometry you'd like to make dynamic with right-click, press space to open the creation prompt, type dynamic (or dtab, if you're feeling lazy), and press enter.
You can make a dynamic body static again by selecting it (right click) and pressing x. (This deletes the "dynamic" modifier.)
Dynamics Parameters
Dynamics have two types of edit mode: geometry (tab), and parameter (shift-tab). Geometry edit mode does what you'd expect -- edits the geometry underlying the dynamic. Parameter edit mode allows you to change some physical (and physics-effecting) parameters:
- source_tag shouldn't be changed.
- seed is the seed for the (somewhat randomized) convex decomposition algorithm. If you don't like how the dynamic is being split into red and green regions, change this.
- gravity is the direction of gravity effecting the block (0-7 are fixed, 8 is "down relative to the current view").
- density is what it sounds like. If the object seems too heavy, use something lower.
- moment_factor scales the moment of inertia. Increasing/decreasing will make the object spin less/more easily.
- rel_pos is a starting offset for the object as (x,y,theta). It don't recommend using it.
Warning
When working when dynamics, save often! Sometimes, the convex decomposition produced by Rktcr's code can contain degenerate polygons, which -- in turn -- will make Box2D (which Rktcr uses for simulation) assert() when you attempt to test a level.
There will be a fix for this in the next version of Rktcr. Until then, save before you test.
(The -- admittedly cumbersome -- work-around is to change the seed value used on the problematic dynamic until you find one where the editor doesn't exit upon running the level.)
Testing
This is what the level looks like after creating all the required dynamics:

At this point -- be sure to save! -- you can press enter to go into physics test mode. (If you end up in play test mode, it's because a portal side was selected.) In physics test mode time runs inexorably forward, and you can grab and pull on objects using the mouse.
Physics test mode will be useful as we create our various constraints.
Constraints
Plain dynamics bodies are fine for creating stacks and tippy platforms, but for the sort of stunts we have planned for this level, we need some physics constraints. Physics constraints are created in the Rktcr editor by pressing c. This creates a constraint between the current dynamic selected and either the previous two dynamic selected or (if the previous selection wasn't a different dynamic) the world.
Another way to say that is: to constrain two dynamics to each-other, right click on them in turn and then press c; to constrain a dynamic to the world, right click on it twice and press c:
Once a constraint has been created, its endpoints may be moved by pressing g while the constraint is selected:
Pressing tab while a constraint is selected allows you to edit its type:
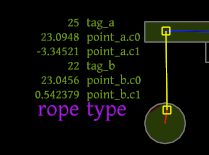
For the hanging circles in the level, we want the constraint type rope, which prevents the constraint points from getting further apart (but does allow them to get closer).
Adding Ropes
Let's finish up the rope constraints.
Keep in mind that x can be used to delete constraints, and make sure to set the constraint type to rope (using edit mode -- tab).
Also, I find that using the size-1 grid (1) and holding shift (snap to grid), helps to keep things aligned when moving constraint endpoints.

Note that the red/blue color of the lines connecting a constraint to its adjacent dynamics depends on the order in which they were selected, and isn't important to the actual simulation (so if yours don't match mine, don't worry).
At this point (and after saving), you can drop into test mode with enter and make sure everything moves how you want it to (e.g. try dragging the circles with your mouse to get a feel for the rope constraint).
Other Constraints
The first stunt in the level uses rod constraints. Create these as before, but make sure there is no previously selected dynamic by right-clicking on the c-shaped piece twice before pressing c.
If you do this properly, one end of the constraint (the one connected to the world) will show as an x instead of a box.
Also, make sure to set their type to rod in edit mode (tab).

I slightly offset the bottom sides of the rod constraints because if I let them start vertical the c-shape would fall before the vehicle entered it. (This is one reason test mode is super-useful when working with dynamics.)
Finally, connect the ramp to the background with a pin constraint, so it will pivot up as the vehicle drives under it and then fall back into place. (Note that pin constraints are actually placed at the average of the two endpoints.)

The constraint's type should be pin by default, but it doesn't hurt to hit tab and check.
Finishing Up
All the constraints are now in place:

Generally, it's good to playtest levels as you go along, but I elided that for the sake of this tutorial. So, the question becomes: is this a winnable level?

Well, the last part is quite tricky (removing the circles might be a good idea), but, yeah, it is possible.
Next Steps
Dynamics are one way to add excitement (and chaos) to a level, but certainly not the only way. In upcoming tutorials, I'll talk about other methods, including working with disruptable platforms and gems; and adding bursts. I'll also go into making your level prettier using style layers; and giving folks a par time using claims.
No comments:
Post a Comment