1. icon for News
  2. icon for TCHOW

News

Showing posts with label games. Show all posts

Tuesday, July 28, 2020

Puzzle Nutrients and The Cubedex of Brass and Wood

The Cubedex Series of games were each designed as virtual puzzle hunt replacements. As such, they have a particular flavor that grew out of my puzzle hunt design strategies. In this post, I will describe what I look for in a cubedex game puzzle, and talk about how these relate to The Cubedex of Brass and Wood, which is forthcoming on Steam (indeed, there is a demo there now).

The Puzzle Nutrients

I tend to think of puzzle-hunt style puzzles as having a few different archetypes. In reality, perhaps they are more like ingredients -- in that they can be mixed and complementary -- or like nutrients, in that a healthy puzzle hunt should contain a balance of all of them.

They are, in no particular order:

Hidden Puzzles

Hidden puzzles present the player with an unknown artifact and ask them to understand the artifact in order to solve it. These are the bread-and-butter of puzzle hunts, and require a sort of logical twist wherein the player must hypothesize rules under which the puzzle might contain information and extract that information. Once the proper rules are found, the puzzle becomes simple to decode, and provides some sort of structure that convinces the player that their decoding is correct.

The simplest hidden puzzles are those that present information in a known encoding scheme -- like resistor color code, semaphore, or ASCII, to name a few -- lightly obscured by some sort of transformation (e.g., written in letters which are mirrored). More interesting encoding puzzles may present physical artifacts that need to be manipulated to produce the decoding effect (e.g., a literal decoder ring, a pattern that must be viewed through a color filter, or -- in one of my favorite examples -- a set of paper tiles, only some of which were treated with a fire-retardant chemical).

A prototypical encoding puzzle in The Cubedex of Brass and Wood is The Clock, which combines a decoder-ring-like device with another encoding scheme.

Combinatorial Puzzles

Combinatorial puzzles challenge the player to find a satisfactory solution from a large solution space. The solution space is generally abstract and generally contains very few satisfactory solutions. This makes brute force search infeasible (or, at least, tedious). However, in contrast to hidden puzzles, the quality of a solution isn't ever in doubt.

Typical puzzles of this sort include physical put-together puzzles (e.g., build a cube from these tetrominoes, fill a bird silhouette with these tangrams) and constraint-satisfaction puzzles like Sudoku. In The Cubedex of Brass and Wood, the prototypical combinatorial puzzle is probably The Balance, in which the player must fill a tray with masses so that it balances.

This puzzle type generally requires one to either constrain the search space by developing a higher-level understanding of the puzzle, or to write a computer program that searches and checks solutions for you. I think both of these solution methods can be really satisfying; indeed, sometimes they can be combined to produce a really, really satisfying solution -- like realizing that "Lights Out" can be solved by using linear algebra over finite fields, or that state equivalence via move reversibility allows for the creation of more efficient Sokoban solvers.

Performance Puzzles

Performance puzzles ask the player to interact with an artifact in order to manipulate it into a good state. Performance puzzles mix well with hidden puzzles and combinatorial puzzles, adding a layer of reflex- or precision-based challenge to the existing puzzle.

I think that performance puzzles are often neglected in a puzzle hunt context because they can be hard to run for a large group in person (for all that they can also be spectacularly fun). Virtual performance puzzles really open up more options in this regard.

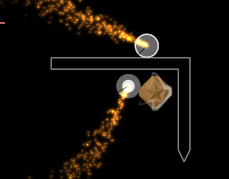
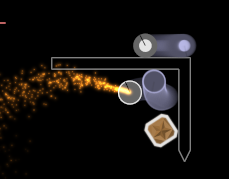
The Cubedex of Brass and Wood's performance puzzle is The Maze, which requires reasonably fine control of the angles of mirrors to direct a beam of light to enable walls to be moved. The version of this puzzle you get in the retail game is actually a toned-down version relative to the original; in the version you'll be able to play, you get to trigger wall movement manually. In the original, wall movement was automatically triggered and any stray hand motion could cascade and ruin the entire maze setup. My testers found this incredibly frustrating, so I changed it.

The Machine is another Cubedex of Brass and Wood puzzle with performance elements, though it is in some ways also a hidden puzzle, given that the interaction rules are not clear. (Arguably, for some variants, it is also a combinatorial puzzle, as at least one tester [threatened to] use Z3 to extract a logical formula consistent with the device's behavior during their solution attempt.)

Building Puzzles

A building puzzle asks the player to assemble a device to overcome a challenge. Like a combinatorial puzzle, the building blocks and goal are generally reasonably straightforward. However, the solution often relies on a [simulated] physical task, rather than a discrete measure of correctness; and the solution space is generally large and open-ended.

Good examples of physical puzzle hunt building puzzles include building a bridge over an obstacle, designing a Lego gear box with a specific ratio, or building an autonomous vehicle that can cross a specific terrain. I use that last idea in The Cubedex of Brass and Wood in The Cart, where the player builds a line following robot using real[-ish] vacuum tube logic components.

One of the fun things about building puzzles is that the players can often design "cheesy" solutions that just barely work; The Cart is not immune to these sorts of solutions, but I think I've included at least one variant of the puzzle that will be hard to solve in an unintended way (prove me wrong! -- it's always fun seeing how these things can be broken).

A Balanced Puzzle Diet

These are the four basic puzzle nutrients that I think about when building a puzzle hunt or game. They can serve as a prompt to make sure the hunt is balanced, or as a lens to look through when attempting to solve a puzzle.

As I continue to polish and release the Cubedex Series, I hope you will look out for these puzzle types in the games. Every game aspires to be a complete meal, but they certainly have different balances of nutrients within them (e.g., The Cubedex of Boxes and Lines is almost entirely hidden puzzles with a performance element).

Sunday, April 9, 2017

Who Wins (Simple) Gwent?

So, a few weeks back, I played some of the beta of Gwent, an online two-player deck-building card game. This post analyzes a very simple version of the game -- one where the cards have value but no text, and both players always draw the exact same cards -- and shows that in this simple version, perfect play results in a tie.

Basic Rules

Let's start with the rules.

Gwent is a two-player card-based point-accumulating game played over three rounds. Players begin the game by drawing 10 cards, of which they may redraw three. During each round, players take turns playing cards. Each card changes the players' points totals. If a player doesn't want to play any more cards during the round they can "pass". The round is over when both players pass.

The player with the higher point total at the end of the round is the winner. In the case of ties, both players are considered to have won. If either player has reached two wins, that player wins the game. If both players win simultaneously, the game is considered a draw. If neither player has reached two wins yet, another round is played.

Points totals are reset at the end of each round. Players replenish their hands by drawing two cards after the first round and one card after the second round.

The first player for the first round is determined randomly; for subsequent rounds, it is the player that won the previous round. I forget what happens in the case of ties, but it's not crucial for the analysis below. (I think that the lead switches.)

Before the game begins, each player constructs a deck of 25 (or more) cards. These decks are where each player draws their cards from. The contents of this deck is limited in various ways that I won't discuss, since part of the conceit of this post is that we're going to ignore the existence of decks and assume each player draws the same cards.

This treatment of the rules also neglects discussions of Factions, Leaders, and Card Text. Briefly, each player must choose a Faction when building their deck. This Faction limits which cards may be used in the deck, and may provide a global ability [e.g. "redraw an extra card at the start of each round"]. Each player must also choose a Leader. A Leader is essentially an extra card that is always drawn at the start of the game. Finally, each card may have complicated Card Text which specifies how it interacts with the point totals and other game state. For the discussion that follows, none of these things will be considered.

Simple Gwent: Provably Boring

In "Simple Gwent", which I will talk about for the rest of the post, all cards have a positive point value, each player starts with the same hand, and both players will draw the same cards between rounds.

It turns out that Simple Gwent always ends in a draw if played competently. Specifically, I will demonstrate that each player can force a draw, regardless of what the other player does. I break this strategy into four cases, depending on the state of the game. In each case, the players are labelled F and S, "first to act" and "second to act". Note that labels may change between rounds.

Case Zero-S: Score 0-0, Same Cards; S to draw/win

In the first round, the second player can guarantee a draw by playing a simple strategy:

  • Play whatever F just played.

This always results in a draw with identical cards remaining, at which point player S uses strategy One-F or One-S to force a draw/win (I don't recall if lead switches on a draw).

Case Zero-F: Score 0-0, Same Cards; F to draw/win

In the first round, the first player can guarantee a draw by playing a very basic strategy:

  • Pass.

This results in one of two outcomes:

  1. Player S plays at least one card and wins; in which case Player F uses strategy Behind-S next round.
  2. Player S passes, which results in a draw, in which case Player F uses strategy One-F or One-S (depending on if the lead switches in a draw) next round.

Case Behind-S: 1-0 (F winning), S Has Card Advantage; S to draw/win

In the second round, when S has a strict superset of F's cards (that is, S has all the cards F has, and at least one additional card), S can force a win/draw by playing as follows:

  • If F plays, play the same card.
  • Once F passes, play the cards in your hand that F does not have in their hand, then pass.

This guarantees a win for S, bringing the score to a 1-1 tie, and making both player's hands the same. At this point, S uses strategy One-F to guarantee a win/tie.

Case One-F: Score 1-1, Same Cards; F to draw/win

In a round where both players have already won and have the same cards, the first player can guarantee at least a draw by following this strategy:

  • Play all cards.

This results in one of two outcomes, depending on what player S does:

  1. If player S plays all their cards, resulting in a tied match and game.
  2. If player S does not play all their cards, and player F wins the match and game.

Case One-S: Score 1-1, Same Cards; S to draw/win

In a round where both players have already won and have the same cards, the second player can guarantee at least a draw by using this strategy:

  • Play all cards.

This results in one of two outcomes, depending on what player F does:

  1. If player F plays all their cards, resulting in a tied match and game.
  2. If player F does not play all their cards, and player F wins the match and game.

Conclusions and Notes

The above demonstrates that Simple Gwent is boring whenever both players draw the same hand and know it. In other words, [full] Gwent is very much a deck-building game -- your basic goal as a player is to make sure that you end up with a better draw than your opponent. Of course, this also suggests that it would be interesting to figure out just what a good draw looks like (obviously, it should be high-scoring; but perhaps it is more important that it have two [three?] high-scoring subsets).

Also, the "Pass First" strategy seems really weird in this context -- shouldn't F take the opportunity to get an early win? Not always! Consider a simplified scenario where players start with one card of value a, draw one card of value b < a after the first round, and a card of value c after the second.

  • Round 1: First player has {a}, second player has {a}: First player plays a, second player passes. First player wins.
  • (players draw b)
  • Round 2: First player has {b}, second player has {a, b}. Then, either:
    • If first player passes, second player plays b (winning), then wins the last round because a + c > b + c.
    • If first player plays b, then second player plays a (winning), then wins the last round because c + b > c

In other words, playing first in simple Gwent can lose you the game. Maybe there's a take-away there for real Gwent (though I think some of the card text is written to explicitly mitigate this problem).

Finally, I should note that in the process of coming up with this reasonably simple proof, I also wrote some reasonably less simple code to explore Simple Gwent game trees and visualize game states. It's not particularly complete, since I ended up not using it for the final post. But if you're interested, you can check it out; it prints some things to the console and also shows a reasonably-nicely styled game state, but mostly it's some half-baked hacks.

Wednesday, February 22, 2017

The New Year We Missed

With the crush of the SIGGRAPH deadline, I failed to both create a New Year's card or even make a post detailing the Jimike New Year's album for 2015/2016. So let's fix that right now, shall we?

Grid Line

My remedial New Year's card for last year is titled "Grid Line", and that about sums it up. The grid gets interesting half-way through. Play here (works on smartphones, too!).

I think this might also be my first New Year's card with sound effects (though those don't work on phones; sorry).

36-Hour Day

Last year's album was titled 36-Hour day, since we were producing it in such widely separated time zones. You can listen on SoundCloud (widget below) or Spotify

Standout tracks for me are "Dear Snails" and "The Only Fi I Have" both of which have honest, if shallow, lyrics.

Monday, November 17, 2014

Soon, You Will Fly: a Leap Motion 3D Jam game

Thanks to a soft deadline this morning, I've posted an alpha build (for Windows and OSX) of a weird little game I've been working on for the Leap Motion 3D Jam presented by IndieCade. It's called "Soon, You Will Fly", and -- perhaps unexpectedly -- it's about crawling.

I'm still working on a few things. Among them: tentacles, a heart/eye, the touch of darkness, and more sound design. Oh, and a way to quit without resorting to ALT-F4.

Anyway, please do check it out and let me know what you think. At present, I'm thinking that this probably doesn't extend beyond a simple jam game; but feedback can change that.

Thursday, September 4, 2014

Fragments: a Ludum Dare Jam Game

A few weeks ago, I worked with my friend Aaron Vonderhaar on a bold experiment: to develop a single-page html game framework and then build a game in it for Ludum Dare.

The result is Fragments [Ludum Dare Page] [Source Code]. It's a put-together puzzle in isometric 3d, telling a somewhat fragmented story of mangled memories.

I'm not entirely happy with how the game came out, but as my first Ludum Dare Jam (as opposed to compo) experience, it was a decent one. It was fun working with Aaron on a project, and I think we did some interesting things in the game framework -- though it wasn't nearly complete enough going into the competition.

Two interesting points of trivia about Fragments:

  • There is no lighting in the game. Everything is baked to vertex colors in Blender during export. This is a trick I also used in Rainbow for the landscape.
  • For some reason, 30% of the CPU time in the game is used by 4x4 matrix multiplies. We probably should have been looking at profiling data earlier. It appears that the construction of Mat4's is very expensive.

Tuesday, January 14, 2014

Iterating on Promo Art for Rainbow

Rainbow for iOS (and for Android!) will be out tomorrow, and as part of the assets for the Google Play store, I needed to design a large (1024x500) promotional image for the game.

As you can see above, I arrived at an pretty good image. I think it captures the essence of Rainbow's art style and gameplay, while striking a balance between cleanliness and boredom.

Arriving at this image required a few iterations. My first mockups had a hand-drawn rainbow that just didn't seem lively enough:

I tried patching in some spirals, but they still didn't look right to me. Perhaps this is because I'm over-familiar with the way cubic splines look (and/or the way rainbows actually move in the game):

So I ended up hacking in a special game mode that uses a white background and hides the level while taking screenshots; and repeatedly played through a simple (splitter-only) level to come up with some rainbow patterns. This turns out to be somewhat difficult.

This was good as a first cut, but too busy. After trimming a few of the characters from the bottom of the image, and playing through my empty level several more times, I arrived at the final version:

I also needed a smaller version of the image with a slightly different aspect ratio (180x120). For this I re-arranged the TCHOW logo to above the word "Rainbow" and strengthened the halo to make the letters more readable:

The final promo and small promo images -- along with high-res versions of other game assets -- can be obtained from the Rainbow Press Kit.

Friday, January 10, 2014

Rainbow for iOS out on January 15th

It's been a while, but Rainbow is finally ready to go on sale in the iOS App store. The game will be out on the 15th of this month, and will sell for $2.

More information about Rainbow can be found on the game's web page and press kit.

Wednesday, November 6, 2013

Rainbow Update: More Music

I am pleased to report that the iOS version of Rainbow is proceeding well. In fact, a 1.0 version has already been accepted for app store sale (though -- owning to some gameplay changes -- I will probably not release it).

So, what have I been working on? Well, other than finding a real job, tweaking and adjusting Rainbow to be an even better game. Part of that is doing things like adding incidental music to cutscenes -- and that's what this post is about.

The Music

The most recent two tracks I added to Rainbow were an opening and closing theme for the villain (and player's persona), who I will simply call "D.D." herein.

The opening theme is meant to be sinister but energetic, as befits a villain whose goal is to bring color and happiness into the lives of a drab people:

The closing theme is meant to be similar to the opening theme but more mellow, because D.D. is now tired from the effort of playing through the game:

One of the things that I think works really well in both of these tracks is the drums. The main drums are from Reason's factory sound library, but are bit-crushed via a Scream4's "digital" method:

I also automate the 'Rate' parameter of the Scream4 in one of the tracks to get some interesting variation into the drums. It's certainly a rough sound, but it's one that I quite enjoyed using in an earlier track.

The parallel channel through the reverb and compressor is generally mixed very low, but it does provide some interesting texture. (The LFO is being used to sweep the resolution on the Scream4 in this channel, which adds more rhythm to the texture.)

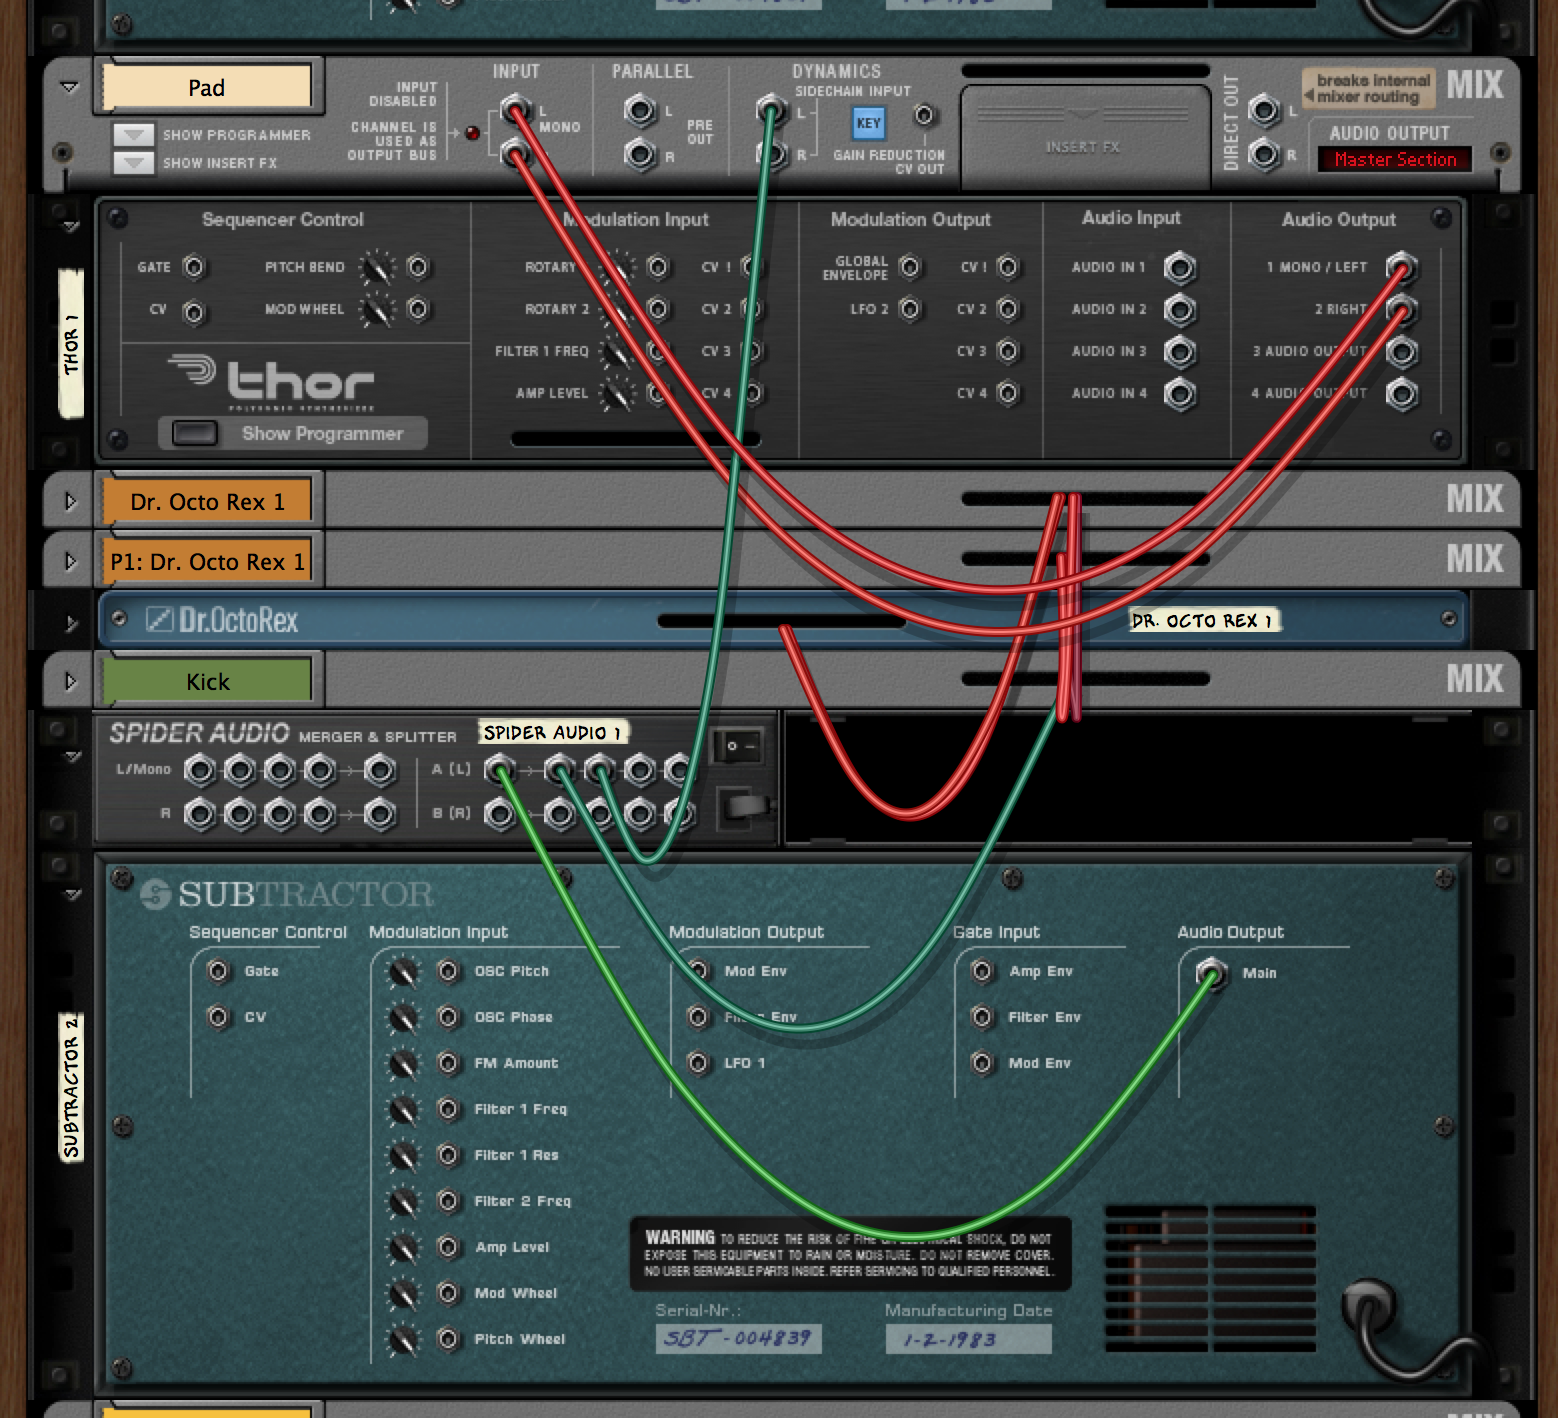
In addition to the main drums, I use a lone synth kick, without any fancy effects, in parts of the track. This kick is used as an sidechain input on the lower pad, in order to make the pad duck the kick (and thus make the kick seem to hit harder):

I doubt Rainbow will be winning any awards for cutscene music design, but these snippets certainly seem better than letting the menu theme continue to play.

Thursday, October 10, 2013

Rktcr Limited Edition (Video)

With just about 12 hours left in the Indie Game Stand sale for Rktcr, I decided to make the following video to give folks a better look at the Rktcr Limited Physical Edition, one of which has now been claimed by the highest contributor in the aforementioned sale.

So if you think this looks cool, start figuring out how to convince me to part with the other copy.

Friday, October 4, 2013

Rktcr's Limited Edition

From October 7th-10th, Rktcr was on pay-what-you-want sale at Indie Game Stand, with 10% of proceeds supporting the EFF. Paying more than average would have netted you an exclusive level pack and a custom digital wallpaper. But that's not what this post is about.

Paying the most would have gotten you one of the only two limited edition physical copies of the game. And these things are amazing. And that is what this post is about.

Each one is an obsessively-crafted testament to my deep love for Rktcr, and feature (from outside to inside):

A paper "Rktcr"-logo band, made from five interleaved sheets, hand-cut and painstakingly assembled.

A Rktcr sprite print box. Each of the four patterns used on these two boxes and their lids are unique and will never appear elsewhere.

A hand-made velvet/foam cushion to showcase...

...a USB drive filled with Rktcr v3.1 and covered in 23K gold leaf, ...

...with a silver-plated chain tassel.

These two limited edition copies are truly amazing things. They, in as non-creepy a sense as possible, reify my deep love for Rktcr, my desire to see it perfected, and my joy at finishing the game. The whole assemblage has a nice weight in the hand, and the drive and chain feel luxurious as you manipulate them.

Tuesday, October 1, 2013

Making Rktcr Levels: Bursts

I'm trying to spend most of my time as of late getting an iOS beta for Rainbow out, so this Rktcr tutorial will be a brief one.

In this tutorial, I will show you how to make bursts -- those little exploding circles that can give the player's vehicle a shove in the right (or wrong) direction.

I will be assuming familiarity with the basics, but nothing more. (Well, other than a full version of Rktcr.)

Bursts

Bursts are actually just gems with the special name. So, to make one, first create a gem (space, gem, enter), then edit its properties (tab), and set the name to burst.

You can still use the front_collide and back_collide properties, like on gems, to change which wheel(s) will trigger the burst.

And that's it! A short tutorial, to be sure, but the upcoming one about style layers will be quite a bit longer. (And, after that, there's only claims and I'll have taught you all there is to know about Rktcr level editing.)

Tuesday, September 24, 2013

Making Rktcr Levels: Disruptable Platforms and Gems

In this Rktcr editing tutorial, I'll talk about how to create disruptable platforms and gems. These are platforms and gems that only one of the vehicle's wheels collide with. This tutorial assumes knowledge of the editor basics.

If you own the full version of Rktcr (and, really, you should), you can grab this level pack to follow along.

In this tutorial, we'll make a level where the player needs to navigate out of the a starting box by letting the front wheel fall through one segment and the back fall through another. After this, the player will need to pick up the final gem with the appropriate wheel (lest it be knocked into the abyss).

Disruptable Platforms

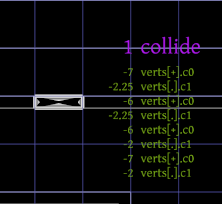
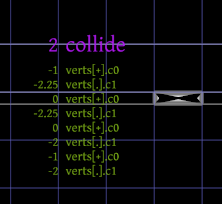
First, we'll make the two short segments in the bottom of the starting area disruptable by going into property edit mode (select, shift-tab), selecting collide (up/down, then enter), and changing the value to 1/2 for the left/right segment (delete, 1/2, enter).

The polygons will now be highlighted in white/gray, indicating that the front/back wheel (only) will collide with them.

Of course, it never hurts to actually check by playtesting the level (select start portal, then press enter).

Disruptable Gems

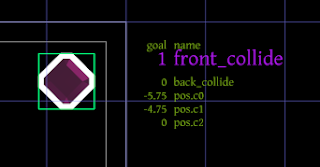
Making the gem collide (instead of be picked up by) the front wheel is a similar procedure. Select the gem, drop into edit mode (tab) and set the property front_collide to 1:

The gem will be surrounded with a white band to indicate that the front wheel collides with it.

As before, you can always confirm that things are working as you expect by playtesting.

Conclusion

In today's rather short tutorial, I showed you how to make disruptable platforms by setting the collide property on level geometry, and how to make disruptable gems by setting that front_collide and back_collide properties on gems. It is worth noting that -- though we did not do so in this tutorial -- you can also change the collide property on dynamics.

Disruptable platforms and gems can lead to situations where players need to carefully consider the vehicle's orientation. They can add challenge to maze-like levels and also allow for tricky momentum-conservation strategies (like letting the wheel that does not collide spin around the one that does).

Next Steps

I've covered nearly all of the features of the Rktcr editor. The only tutorial subjects that remain are bursts; style layers; and claims.

Tuesday, September 17, 2013

Making Rktcr Levels: Dynamics and Constraints

In this Rktcr level creation tutorial, I will describe how to add dynamic (i.e. physically-simulated) geometry to levels, and how to add constraints between these dynamic bodies. This tutorial builds on ideas introduced in the basics and geometry tutorials.

And, as before, you'll need the latest full version of Rktcr (v3.1 as of this writing).

In this tutorial, I'll start with some existing static geometry, and make some of it dynamic. Above, you can see the plan I'll be following.

If you'd like to follow along, you can download a zip file containing this level (along with the finished version) here. Place the files in your ".rktcr/e_levels" folder, start Rktcr in edit mode, and load tut-dynamics with f4.

Making Dynamics

In Rktcr, all dynamic bodies are created from static geometry, much in the same way smoothed polygons are created from regular polygons.

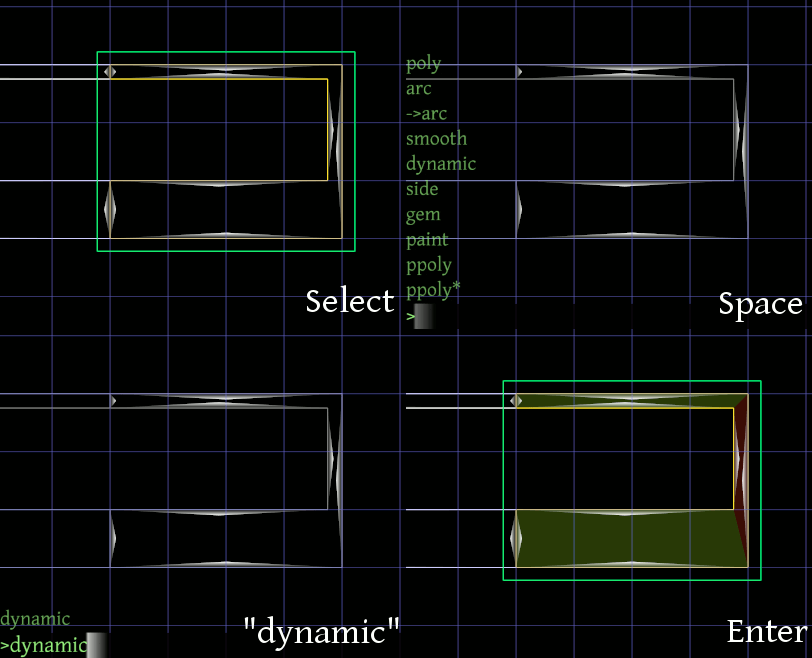
Select the static geometry you'd like to make dynamic with right-click, press space to open the creation prompt, type dynamic (or dtab, if you're feeling lazy), and press enter.

You can make a dynamic body static again by selecting it (right click) and pressing x. (This deletes the "dynamic" modifier.)

Dynamics Parameters

Dynamics have two types of edit mode: geometry (tab), and parameter (shift-tab). Geometry edit mode does what you'd expect -- edits the geometry underlying the dynamic. Parameter edit mode allows you to change some physical (and physics-effecting) parameters:

  • source_tag shouldn't be changed.
  • seed is the seed for the (somewhat randomized) convex decomposition algorithm. If you don't like how the dynamic is being split into red and green regions, change this.
  • gravity is the direction of gravity effecting the block (0-7 are fixed, 8 is "down relative to the current view").
  • density is what it sounds like. If the object seems too heavy, use something lower.
  • moment_factor scales the moment of inertia. Increasing/decreasing will make the object spin less/more easily.
  • rel_pos is a starting offset for the object as (x,y,theta). It don't recommend using it.

Warning

When working when dynamics, save often! Sometimes, the convex decomposition produced by Rktcr's code can contain degenerate polygons, which -- in turn -- will make Box2D (which Rktcr uses for simulation) assert() when you attempt to test a level.

There will be a fix for this in the next version of Rktcr. Until then, save before you test. (The -- admittedly cumbersome -- work-around is to change the seed value used on the problematic dynamic until you find one where the editor doesn't exit upon running the level.)

Testing

This is what the level looks like after creating all the required dynamics:

At this point -- be sure to save! -- you can press enter to go into physics test mode. (If you end up in play test mode, it's because a portal side was selected.) In physics test mode time runs inexorably forward, and you can grab and pull on objects using the mouse.

Physics test mode will be useful as we create our various constraints.

Constraints

Plain dynamics bodies are fine for creating stacks and tippy platforms, but for the sort of stunts we have planned for this level, we need some physics constraints. Physics constraints are created in the Rktcr editor by pressing c. This creates a constraint between the current dynamic selected and either the previous two dynamic selected or (if the previous selection wasn't a different dynamic) the world.

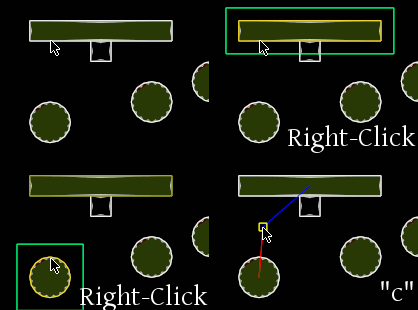
Another way to say that is: to constrain two dynamics to each-other, right click on them in turn and then press c; to constrain a dynamic to the world, right click on it twice and press c:

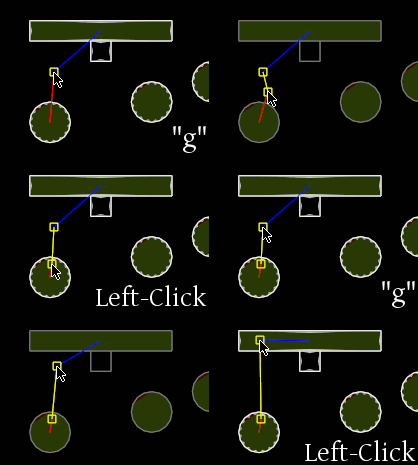
Once a constraint has been created, its endpoints may be moved by pressing g while the constraint is selected:

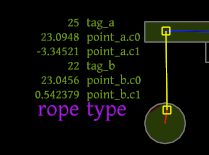
Pressing tab while a constraint is selected allows you to edit its type:

For the hanging circles in the level, we want the constraint type rope, which prevents the constraint points from getting further apart (but does allow them to get closer).

Adding Ropes

Let's finish up the rope constraints. Keep in mind that x can be used to delete constraints, and make sure to set the constraint type to rope (using edit mode -- tab). Also, I find that using the size-1 grid (1) and holding shift (snap to grid), helps to keep things aligned when moving constraint endpoints.

Note that the red/blue color of the lines connecting a constraint to its adjacent dynamics depends on the order in which they were selected, and isn't important to the actual simulation (so if yours don't match mine, don't worry).

At this point (and after saving), you can drop into test mode with enter and make sure everything moves how you want it to (e.g. try dragging the circles with your mouse to get a feel for the rope constraint).

Other Constraints

The first stunt in the level uses rod constraints. Create these as before, but make sure there is no previously selected dynamic by right-clicking on the c-shaped piece twice before pressing c. If you do this properly, one end of the constraint (the one connected to the world) will show as an x instead of a box. Also, make sure to set their type to rod in edit mode (tab).

I slightly offset the bottom sides of the rod constraints because if I let them start vertical the c-shape would fall before the vehicle entered it. (This is one reason test mode is super-useful when working with dynamics.)
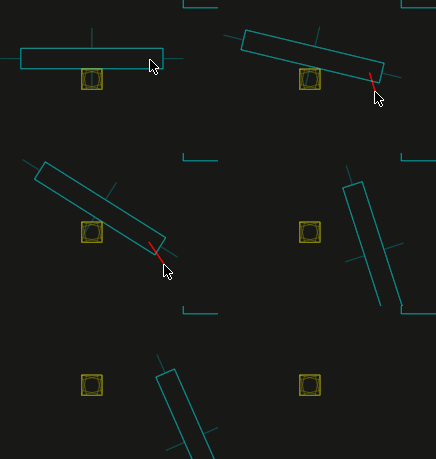
Finally, connect the ramp to the background with a pin constraint, so it will pivot up as the vehicle drives under it and then fall back into place. (Note that pin constraints are actually placed at the average of the two endpoints.)

The constraint's type should be pin by default, but it doesn't hurt to hit tab and check.

Finishing Up

All the constraints are now in place:

Generally, it's good to playtest levels as you go along, but I elided that for the sake of this tutorial. So, the question becomes: is this a winnable level?

Well, the last part is quite tricky (removing the circles might be a good idea), but, yeah, it is possible.

Next Steps

Dynamics are one way to add excitement (and chaos) to a level, but certainly not the only way. In upcoming tutorials, I'll talk about other methods, including working with disruptable platforms and gems; and adding bursts. I'll also go into making your level prettier using style layers; and giving folks a par time using claims.